Help for Hobbies of all Sorts by Rene' Hobbie

Saturday, December 24, 2011

Neighborhood Christmas Fun

We had some neighborhood fun this week with the kids.  Our next door neighbor and friend invited the children and moms (Sorry Dads...you were working)  to come over one afternoon and make cookies.  It was a blast!


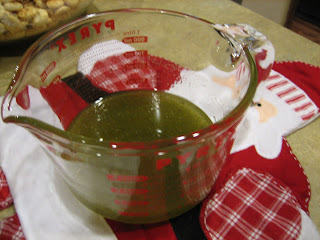
The next day, we congregated at our house for refreshments and a craft.  I had a little Grinch theme going on.  I made Grinch Cookies and Grinch Punch.  How The Grinch Stole Christmas played in the background.  Here is the recipe for...

Grinch Cookies
1 pouch Betty Crocker Sugar Cookie Mix
1/2 cup butter, softened
1/4 to 1/2 t. mint extract
6 to 8 drops green food coloring
1 egg
1 cup creme de menthe baking chips
1 cup semi sweet chocolate chunks

Preheat oven to 350 degrees.  In a large bowl, mix together the first 5 ingredients.  Stir in the baking chips and chocolate chunks.  Using a teaspoon, drop cookie dough onto an ungreased baking stone.  Bake 8 to 10 minutes to set.  Let cool for three minutes before transferring to a wire rack.  Eat warm or cool completely. 

For an extra special touch, drizzle cooled cookies with melted chocolate. 


A friend of mine told me that when the Grinch movie was being made, that the producers set about trying to find the ugliest hue of green to use for the Grinch.  Ugly would succintly describe the color of my cookies.  As a matter of fact, most of the kids wouldn't even touch them.  LOL  Good thing that I had some Oreos on hand.  However, the adults thought they tasted great. 

For the Grinch Punch, I simply scooped some lime sherbert into cups and added 7-Up.  Yummy!

I unfortunately had to break away from my Grinch theme for the craft, because I couldn't think of or find an idea that satisfied me.  The kids painted an ornament of a snow family using their hands.  They worked so hard, and the ornaments turned out to be so cute! 

With acrylic white paint, I painted each child's fingers (snowmen) and a little bit of his/her palm (mound of snow).  They then made an imprint on their chipboard ornament.  The kids finished painting their snow family with toothpicks. 


LITTLE MASTERPIECES!  Don't you love kid's art?

If you made it all the way to the end of this post, you are quite a trooper!  We wish you a very
MERRY CHRISTMAS!!

Thursday, December 22, 2011

Potato Soup and Beer Bread

If these cold winter nights are chilling you to the bone, here are two recipes that will warm you right up! Plus, they couldn't be easier to make! 

Potato Soup
30 oz bag of frozen shredded hash brown (I used OreIda)
3 (14 oz.) cans of chicken broth
1 can cream of chicken soup
1/2 of a chopped onion
1/4 t. ground pepper
1 (8 oz.) package of cream cheese (not Fat Free...It won't melt)

Place all ingredients in a large pot except the cream cheese.  Bring the mixture to a boil stirring often.  Cook on a medium heat setting for about thirty minutes.  You'll want to continue to stir often.  Add the block of cream cheese and continue to cook until it melts...approximately thirty more minutes.  Serve with crumbled bacon, shredded cheese, and chopped green onions.

I understand that this recipe can also be made in the crockpot.  Follow the directions above cooking ingredients for 6-8 hours.  Add the cream cheese the last hour of cooking. 

Beer Bread
3 cups self rising flour
1/4 c. sugar
1 bottle beer
1 stick melted butter

In a large mixing bowl, combine the first three ingredients.  Loosely press into an 8x8 inch pan.  Bake at 350 degrees for 30 minutes.  Remove bread for the oven and pour melted butter on top.  Bake the bread an additional 10 minutes.  Cut into squares and serve hot. 

I got both of these recipes from this amazing blog .

Thanks for stopping by my blog.  Let me know if you have any questions!

Wednesday, December 21, 2011

Remember shaking your presents under the tree at Christmas time?  My brother and I didn't have as easy of a time doing that, because we didn't know which presents were ours.  My mom used to write our names in shorthand on the tags, and we couldn't figure it out!  I thought that would be a fun thing to do for my son this year, but I don't know shorthand.  I'll have to work on that for next year. 


I wanted to make some handmade tags for our gifts this year, and since monogramming is popular...I got my Sizzix dies and Cricut out to make some monogrammed tags for our gifts.  I like the way they turned out, and they were fun and easy to make!

I'm off to bake cookies and wrap more presents.  Have a great day!

Tuesday, December 20, 2011

What favorite recipes do you make each Christmas?  Oyster Cracker Snack Mix can be made any time of the year, but we save this special recipe for the holidays.  Let's get busy and make it.  These are the ingredients you will need.


Oyster Cracker Snack Mix
2 (9 oz) bags oyster crackers
1 c. vegetable oil
1 pkg Hidden Valley Ranch Dressing Mix
1 t. dill weed
1/2 t. lemon pepper
1/4 t. garlic salt

Place the oyster crackers in a large ceramic bowl and set aside.

In a large measuring cup, mix all other ingredients. 

Pour the oil mixture on top of the crackers. 

Now the fun begins.  Stir the crackers until the oil is absorbed...about 20 minutes.  This is a great project to get the whole family involved, because when one person gets tired of stirring another can take over. 


I hope you enjoyed learning about this tasty treat.  Thank you for stopping by my blog. 

Sunday, December 18, 2011

For my son's teachers this year, I made a little set of things they could use to correspond with their students and parents.

The set included a post it note holder, long skinny tablet, tin with 3x3 cards, and a gift certificate holder. 

Cellophane bags make for a nice presentation, and they are easy to prepare, too.  

Materials Used:
Cardstock:  Real Red (Stampin Up)
Patterned Paper:  The Grade School Stack (by DCWV) purchased at Hobby Lobby
Punches:  Circle and Scallop Circle Punch (Stampin Up)
Stamps:  School Time and Take Note (Papertrey Ink)  LOVE THESE!
Embellishments:  Ribbon (Stampin Up)

I've got a lot to share with you this week, so please stop back by.

Monday, December 12, 2011

After seeing this simple recipe on Pinterest, I knew I wanted to try it.  Since I take a sandwich to school most days, eating them any other time never excites me.  Well, these are a great alternative.  Serve them with some soup, and you've got a great meal on a cold winter night. 

You only need three ingredients:
crescent rolls (I used a can of 4 rolls, but you can certainly get the larger can.)
pepperoni
string cheese

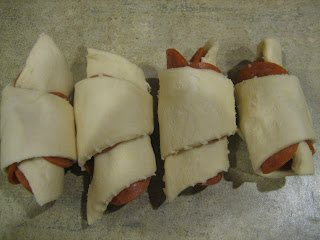
Assemble the ingredients as shown above using only half a piece of string cheese. 

Roll them up and place them on a baking pan.  Bake at 375 degrees for 12-15 minutes or until golden brown. 

Enjoy!

Thank you for stopping by my blog today.  Make it a great day!

Saturday, December 10, 2011

How would you feel about inviting a total note taking stranger into your home to celebrate Christmas with your family?  That's exactly what Hank Steuver, writer for the Washington Post, was allowed to do as he followed the lives of three families from Frisco, TX. 

I found this book to be extremely interesting.  Although I live in McKinney, it's only a few miles from Frisco.  When my car leaves our driveway, it usually heads there, because that's the town that I work, shop, and play in.  As I read about many places that I frequent often (like the Stonebriar Shopping Centre), the radio station (KLTY) that I listen to every day, the roads that I drive, it gave me a new perspective of these things that I experience almost daily.

Although I borrowed this book from one of our Frisco High Schools, I'll be purchasing my own copy to keep in my personal library.  You won't want to miss this great read!

In Tinsel, Hank Stuever turns his unerring eye for the idiosyncrasies of modern life to Frisco, Texas—a suburb at once all-American and completely itself—to tell the story of the nation’s most over-the-top celebration: Christmas.
 
Stuever’s tale begins on the blissful easy-credit dawn of Black Friday, as he jostles for bargains among the crowds at the big-box stores. From there he follows Frisco’s true believers as they navigate through three years of holiday drama. Tammie Parnell is the proprietor of “Two Elves with a Twist,” a company that decks the halls of other people’s McMansions. Jeff and Bridgette Trykoski spend eleven months preparing the visible-from-space, awe-inspiring light display they stage on their lawn each December. And single mother Caroll Cavazos, a devout churchgoer, hopes that the life-affirming moments of the season can transcend her everyday struggles. Tinsel is a humane, revealing, and very funny portrait of one community’s quest to discover a more perfect holiday amidst the frenzied, mega-churchy, shoparific world of Christmas.

Thursday, December 8, 2011

Tis the season for making memories, and SU makes it so easy with their beautiful Simply Scrappin Kits and albums to match.  Here is a 6x6 inch scrapbook that is ready to hold our Christmas pictures.


Materials Used:
Cardstock:  Cherry Cobbler, Lucky Limeade, Soft Suede, Early Espresso
Christmas Lane Simply Scrappin Kit
Cherry Trim 6x6 Album
Assorted Ribbons

I got the inspiration for this album from my friend Amy Storrie. 

Thanks for dropping by my blog today!  Let me know if you have any questions.

Saturday, December 3, 2011


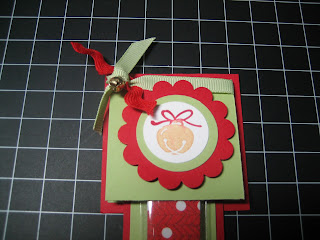
You've gotta love the dollar bins at Michael's.  I found these colorful Mary Engelbreit emery boards and wanted to package them to give as little gifts.  My stepmother, Linda, calls these little presents "happies"...just a tiny something to brighten someone else's day.  She's a master at being thoughtful in this way.  To make these little happies, I put the nail file in a Stampin Up 1x8 inch cellophane bag.  I then used cardstock to match-real red and certainly celery. 


The small green topper measures 2x4 inches.  I just folded it in half and backed it with red cardstock measuring 2 1/4 x 2 1/4.  I colored the bell image with so saffron and real red markers and punched it out with a 1 1/4 circle punch.  The ribbon is certainly celery also.  I added some red rick rack that I had on hand.  The tiny brass bell made a great finishing touch.  I bought those at Hobby Lobby. 

I got the idea for this project from the fantastic Becky Roberts.

I hope you enjoyed learning about this fun craft.  Thank you for stopping by my blog!

Thursday, December 1, 2011

I recently made this fast and simple dip recipe for my stamping friends on a very cold November evening.  The dip was nice and hot and was a great alternative to queso which tends to be one of my go-to appetizers.  I placed all the ingredients below in my mini crock pot but halved the recipe.  Even at that, it made a lot!  Here is the recipe...

Easy Slow-Cooker Bean Dip
4 (16 oz) cans refried beans-I used El Paso.
2 (8 oz) pkgs. colby jack cheese cubes
1 1/4 oz. pkg taco seasoning mix-I used the whole package although I halved everything else.
1 bunch green onions, chopped
1 c. sour cream
8 oz. pkg. cream cheese, cubed

Place all ingredients in a slow cooker; stir to mix.  Cover and cook on low setting 2 1/2 hours.  Stir often.  Makes 11 cups.  I served the dip with Frito Scoops.

I got this recipe from a book that I purchased at our school's Scholastic Book Fair.  It's a Gooseberry Patch publication, and I tend to really like their products. 


Thanks for stopping by my blog.  Have a terrific day!